Matt Jones Tech
  • Blog
  • Video Projects
  • Web Projects
  • Can We Talk About TMUX

    Can We Talk About TMUX

    What the heck is tmux? I gotta be honest, I didn’t really know or care what tmux was or what it could do until I came up against a problem I didn’t have a solution for. If you’ve been reading along, last week I dusted off my unused Raspberry Pi and hooked it up with an LCD display. Quite a fun project, and I’m definitely not done with it, but, it wasn’t too long after the LED display setup that I ran into a problem.

    The Problem

    You see, just to get started and learn my way around the LCD display, I ran a few scripts just to see if I could successfully display anything on the screen. It worked! As I got closer to my original plan for the Pi project, I wanted to be able to SSH into the Pi, write and execute a long-running script (long-running as in… basically forever) and then EXIT my SSH session and have the script still running. Yeah, as you can imagine, after exiting my SSH session, as soon as I was disconnected, my script would stop running as well. How can I solve this?

    Enter TMUX

    After a bit of searching, it would seem there are a handful of different solutions to this problem nohup, screen and of course tmux. I opted for tmux because I’d heard of it before but never really explored it, and lots of people online really seemed to use it with great satisfaction.

    So what does it do?

    tmux is a terminal multiplexer. Basically, it allows you to place a terminal inside your terminal and a terminal inside that terminal and so on. It’s extremely capable and very powerful, and for my particular use case, I’m barely scratching the surface. But the key feature I needed was tmux‘s ability to disconnect from and resume terminal sessions.

    Setup

    In order to use tmux, you’re gonna need it installed. Great news, it only needs to be installed on your server or the device you’re SSH-ing into. To install it, on Ubuntu/Debian, it’s as easy as sudo apt install tmux. If you’re using a different system, there’s tons of installation methods, and the whole project is on GitHub, so feel free to check it out

    Basics

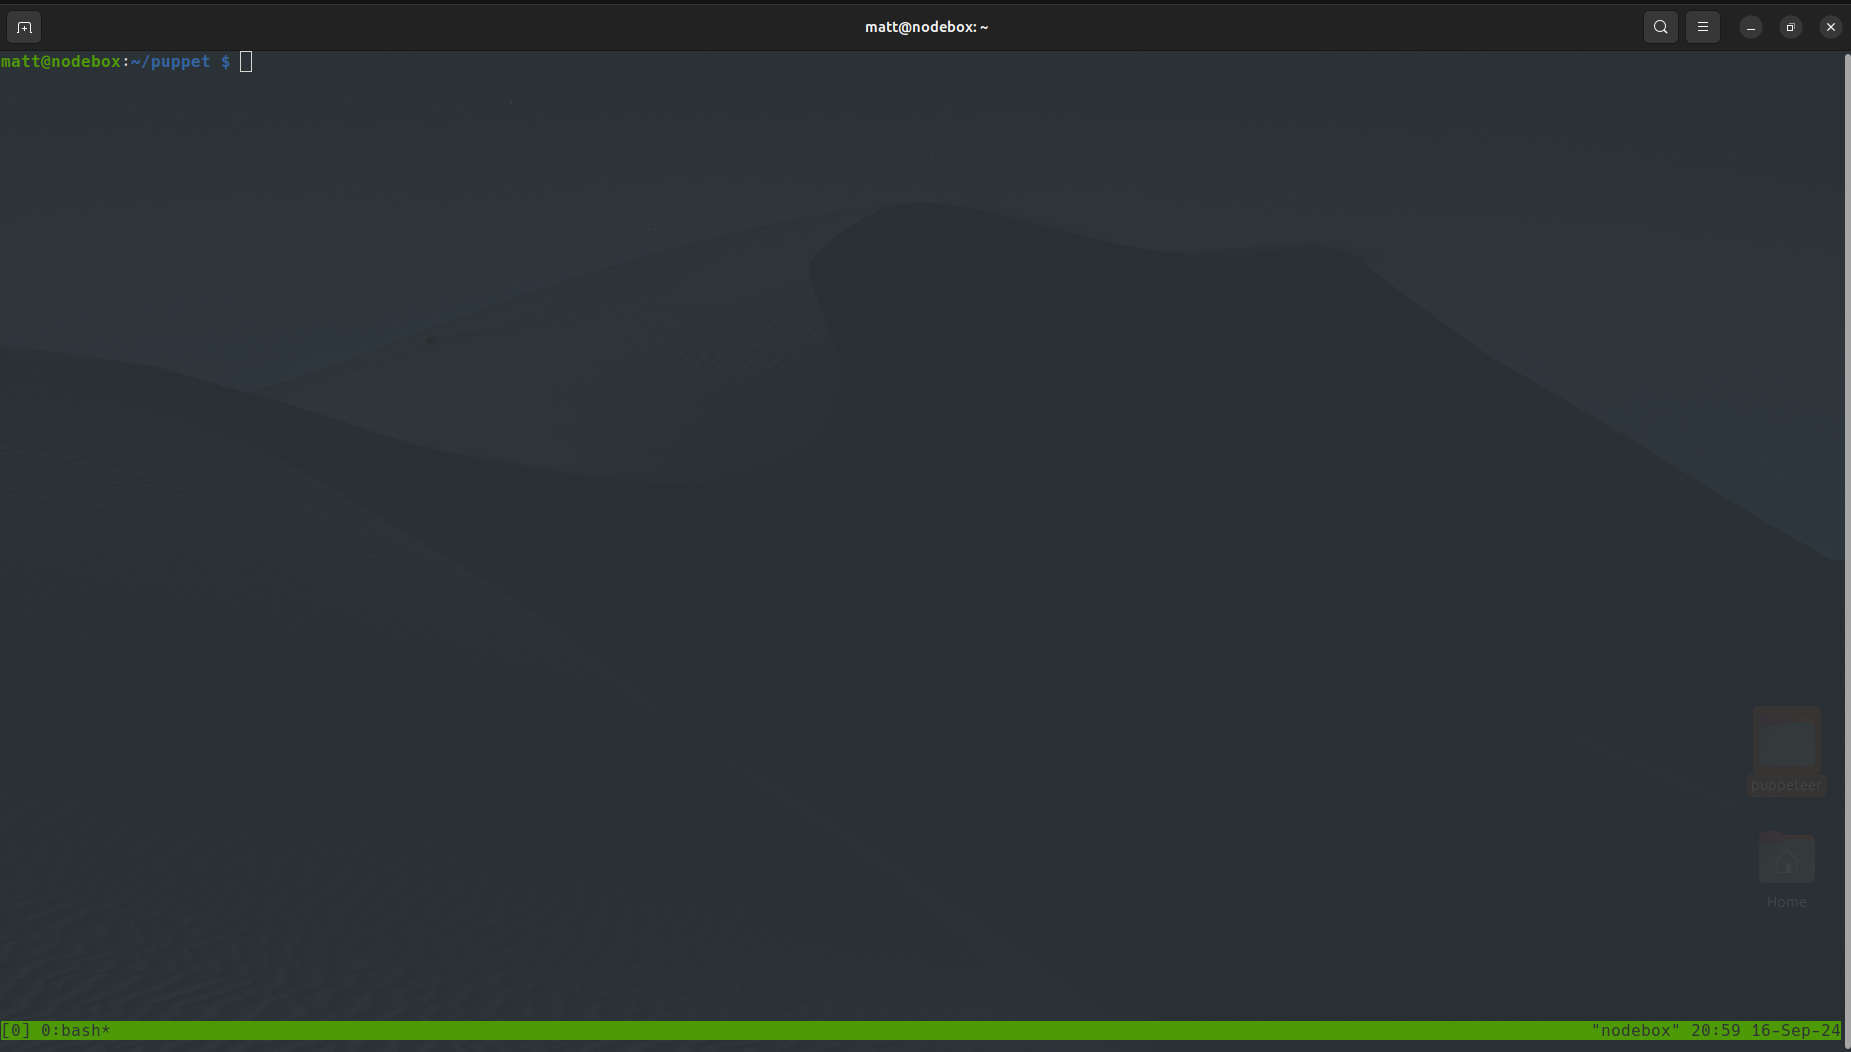
    Once it’s installed, you can simply run it with tmux. It may not look like much happened, but once you see a little green bar appear at the bottom of your screen, that’s it. You’re IN. It’s just like a regular terminal session, you can do whatever you want (like execute long running scripts, ping google forever, count to a million, whatever). Once your terminal is going, you can detach from that session by hitting the default prefix hotkey CTRL+B (Kinda the Vim-equivalent of ESC, it won’t look like anything happened, but it puts you in “command mode” where tmux is essentially awaiting instructions).

    After you’ve hit CTRL+B, you can detach from the active session with d. That’s it. Done. Now that you’re detached from your tmux session, you can exit the shell (disconnect from your SSH session) and that’s it. You’re free. Go for a walk, drive somewhere, go eat lunch, take a break, whatever.

    Reconnecting

    Then, some time later, let’s say you want to reconnect to that tmux session you started a while ago. Just SSH into that machine running your process (it can even been from a different device, location, or IP!) and you can reattach yourself to the last (most recently run) tmux session with tmux a which is short for tmux attach.

    And boom. That’s it. You’ve reconnected to the terminal session you started some time earlier, you can kill the process, make updates, do whatever you need to do.
    matt

    September 23, 2024
    Linux, Raspberry Pi, Ubuntu
  • Fix Audio on XFCE Chromebook

    Fix Audio on XFCE Chromebook

    The Problem

    After moving from GalliumOS to Xubuntu, I noticed that playing YouTube videos on both Firefox and Chromium would result in decent playback for a few minutes, but suddenly the audio would turn into a solid beeping tone while the YouTube video displayed the white loading circle on top of the video as it continued trying to play.

    The beeping sound would continue until I paused the video for long enough for the beep to stop on its own, or just close the tab. According to some forums around the net, it seemed to be an audio codec or driver issue. After a bit of digging through posts of similar but not exact audio issues, I found one that seemed to match my situation exactly.

    The Solution

    Apparently this was an issue with running a kernel that didn’t support and/or didn’t have a Sound Open Firmware (SOF) driver installed. Someone brought up an issue on their Github page and a solution was found and shared. This solution was also referenced in a few other places, so I gave it a shot and it 100% worked.

    You can install the drivers with this epic bash script (please check it out before running it):

    wget -qO- https://gist.github.com/heikomat/3fe272431b44b580c933bfb901a92257/raw | bash

    And once that script completes, tack on options snd_sof sof_debug=1 to /etc/modprobe.d/alsa-base.conf

    Reboot your computer and that should take care of the audio issues when playing videos or music.

    matt

    May 30, 2023
    Linux, Ubuntu
    linux, open source, ubuntu
  • How to Remove a PPA via the Command Line

    How to Remove a PPA via the Command Line

    If you’ve used Linux for any amount of time, you’ve probably come across a PPA. A PPA is short for Personal Page Archive. If you’re looking for a specific piece of software not available in the official software store for your distro, you might look into adding a PPA. Most software that is offered via PPA includes the installation instructions to add their PPA and get everything installed. However, not every software includes instructions on how to remove their PPA and uninstall everything. In this tutorial, we’re gonna learn how to remove a PPA via the command line.

    Side Thoughts

    As far as I’ve heard on forums and StackOverflow and pretty much everywhere else, it’s typically not the best idea to install software using a PPA. I did it a few years ago when I was first getting into linux, but I don’t do it at all anymore. Generally speaking, PPAs aren’t the safest thing to be using and I really don’t have much need for them anymore. In fact, on of the biggest reasons I switched to Manjaro a while back was because of the massive AUR (Arch User Repository). There you can find a massive community of Arch users who have created a ton of software and configured it just for Arch. Still getting the hang of it, but so far it’s been amazing.

    Now for the Actual Tutorial

    If you happen to know the exact URL of your PPA, you can remove it by using the --remove flag:

    sudo add-apt-repository --remove ppa:otto-kesselgulasch/gimp

    Not that you’d ever remove GIMP! It’s an awesome photo manipulation program and it’s included in official software stores in most distros anyway.

    If you don’t know or can’t remember your exact PPA location, you can browse all the files in /etc/apt/sources.list.d/

    ~$ cd /etc/apt/sources.list.d/
    ~$ ls

    Once you find the PPA you wanna trash, just run:

    ~$ sudo rm nameOfThatPPA.list

    also, if you have a .save file paired with it, just trash it as well.

    ~$ sudo rm nameOfThatPPA.save

    matt

    January 5, 2020
    General Computing, Linux, Ubuntu
    linux, package manager, PPA, ubuntu, update
  • A Note About Running DaVinci Resolve on Ubuntu 18.04

    A follow-up to my previous post

    Earlier this week I decided to run DaVinci Resolve on Ubuntu 18.04. This was a terrible idea. I spent the last 3 days banging my head against a wall and scouring countless forums, blogs, articles, and all for nothing. Here’s my situation. I have an AMD Threadripper with a pair of RTX 2080TIs that I was trying to use with Ubutnu and Davinci Resolve.

    Of course, if you plan to run Davinci Resolve on Ubuntu 18.04, the default Ubuntu install pretty much gives you the generic graphics drivers and it’s up to you to install the ones you need. Since I want to run Resolve, I’ll be needing the latest Nvidia drivers for Linux. Downloaded and installed from the website, but it didn’t work. Installed CUDA, but it didn’t work.

    I tried so many different drivers that they started conflicting with each other and it became an even bigger mess than what I started with. I rebooted a ton of times and sometimes the drivers would work, and other times they wouldn’t even switch from the old driver. I tried with and without CUDA and with and without OpenCL, but nothing worked. I couldn’t get anywhere beyond the opening splash page.

    TL;DR

    Guys, just save yourself the trouble. Seriously. If you’re wanting to run Davinci Resolve on Linux, but you don’t want the official CentOS build… Do yourself a huge favor, avoid the headache and just install Manjaro. Seriously. I was up and running in Davinci Resolve cutting 5K RED footage in 15 minutes. It’s the easiest Linux video workstation setup ever. I’m never going back.

    Full disclosure: I’m not being paid to write this. Opinions are my own. This is just my experience. As always, keep your passwords secure, and your sources open. Cheers.

    matt

    December 5, 2019
    DaVinci Resolve, Linux, Ubuntu
    davinci resolve, linux, manjaro, ubuntu, video editing
  • How to Fix Write Permissions For DaVinci Resolve

    Here’s how to fix write permissions for DaVinci Resolve.

    Oh snap

    To fix this, just open a terminal and run:

    chmod -R 766 /your/problem/drive/or/directory

    What’s Going On?

    On linux, security is brilliantly built in. By default, files and folders that you create have a set level of permissions (defined by the umask command). Typically, the default is the user (you) have permission to read and write files that you own, as well as search directories you own. All others have read-only access to your files and directories.

    Knowing this, other applications (aka Resolve) do not have permission by default to write to hard drives, folders, or files that you (the user) own. So how do we change this?

    chmod

    To change permissions of a single file or a whole directory, use the chmod command. chmod gives you the ability to change permissions using short, 3-digit number formats. These are known as octal numbers.

    Octal NumberPermissionsFile Listing
    7read, write, and executerwx
    6read and writerw-
    5read and executer-x
    4read onlyr–
    3write and execute-wx
    2write only-w-
    1execute only–x
    0none—

    So in the chmod command, you use the above table to define permissions for the file user/owner, members of the file group, and other people, in that order. The -R flag used in the code above, simply makes the command recursive, applying to every single file and folder inside the directory you apply the command to.

    Examples

    Readable by owner only: chmod 400 examplefile.txt

    Allow the owner and group to read, write, and execute, and anyone else to read and write: chmod 776 examplefile.txt

    Also, there’s an awesome tool for those of you, like me, who can’t keep all those chmod codes straight!

    After this post made it to Twitter, @rohit_bmd made a great point- check Davinci Resolve > Preferences and under the Media Storage tab, you’ll see a list of drives on your system. Make sure you have read/write privileges on the drive at the very top of that list, because that’s where Resolve will be storing all your cache files. Here’s the the tab:

    If you’re new to Resolve on Linux, feel free to check out my other posts.

    matt

    October 4, 2019
    DaVinci Resolve, General Computing, Linux, Ubuntu
    blackmagic design, command line, davinci resolve, file permissions, linux, terminal, video editing
  • Locate Files using Terminal

    Let’s locate files using the terminal! This is just a cool little trick you can use if you’re doing a bunch of stuff in the terminal, and you don’t want to leave, or you’re just interested in cool terminal tricks. Let’s say you’re looking for a file, anywhere on your machine, but you don’t know exactly where it is. You can install a very cool search package called mlocate (or merging locate).

    Install

    On Ubuntu/Debian you can run:

    sudo apt-get install mlocate

    Or if you’re on that Manjaro/Arch life:

    sudo pacman -S mlocate

    Syntax

    To locate files in the terminal by using mlocate, just type:

    locate [name of the file] [directory in which you want to start recursively searching]

    If you’re using mlocate for the first time, it’s not gonna work just yet. mlocate is actually a pair of tool bundled into one. The other half of mlocate is called updatedb. So by running updatedb, you’re essentially creating/updating an index so that you can run your search. So any time you want to run a locate command and it’s not giving you the results you are expecting, there’s a good chance your index is outdated, so you can just run updatedb, then run your locate search again, and you should be good to go.

    Update your junk by running updatedb then run locate [file] to get your mind blown!

    Bonus Tip

    If the results of your locate command are crazy long, like… CRAZY long…. too long to view everything in the terminal because your terminal only has a finite history, here’s a tip: You can print the results of ANY command to a text file and save it anywhere by using >. For example:

    sudo locate myfile.txt / > ~/Desktop/searchresults.txt

    The above command will run a system-wide search for anything matching myfile.txt recursively from the root directory / and print the results to searchresults.txt on the Desktop.

    Good luck and have fun! Now that you’ve found the file you’re looking for, perhaps you want to do something cool with it! If you wanna learn more cool stuff you can do in the terminal, check this out.

    matt

    September 23, 2019
    General Computing, Linux, Ubuntu
    arch, command line, debian, linux, manjaro, search, terminal, ubuntu
  • Why The Breeze Cursor Theme is The Best

    Themes

    So basically, there are themes.

    Themes can do a lot to change the look and feel of your computing experience. If you’re a Linux user, there’s a good chance you like things customized. Just have a Google for “linux themes” and you’ll see what I mean. You can take this to whatever level you want. You can change the look and feel of literally everything, or you can do a subtle cursor change like me.

    Breeze Theme

    Lately I’ve been a fan of the Breeze cursor theme. To get that theme and a selection of other themes to choose from later, open a terminal and install the unity tweak tool and a few theme libraries:

    $ sudo apt install breeze-cursor-theme oxygen-cursor-theme oxygen-cursor-theme-extra unity-tweek-tool

    Once you install the themes and the unity tweak tool, you can open the tweak tool and head over to Appearance > Cursors. Click through the list until you find one you like. Make note of the name. Once you’ve got one, open your terminal again and type:

    $ sudo update-alternatives --config x-cursor-theme

    This will bring up a list of all the themes you’ve installed on your system. Look through the list and find the theme you liked. Type in the number of your selected theme to confirm your changes. To make sure your changes remain changed, simply run:

    $ compiz --replace

    and you can either reboot or log out and log back in to make your changes. That’s it! Enjoy your new look!

    matt

    April 16, 2019
    Lifestyle, Linux, Ubuntu
    breeze, computing, cursor, linux, pc, theme, ubuntu, windows
  • Using 3DConnexion Spacemouse with Linux

    Uh… 3DConnexion Spacemouse Wireless?

    If you’re like me and spend any amount of time in the 3D world, whether it’s for game design, game development, motion graphics, 3D animation, or CAD, you’ve probably felt a bit limited and slow when it comes to navigating the 3D viewport. In some programs, you even have to grab different tools or hold hotkey combos to get the movement you want (zoom, pan, fly, rotate, etc). A company called 3DConnexion has made a fantastic effort to fix all that. For this driver install, I’m using a 3DConnexion Spacemouse Wireless.

    If you’re on a Mac or a Windows machine, it’s as easy as heading over to their site and installing one of their official drivers. It even comes with a little training program to help you get the hang of the basics.

    Unforuntately, 3Dconnextion dropped linux support some time ago. They technically have a Linux driver available on their official site, but it doesn’t work. However, I found the solution:

    Setup

    There is an excellent 3rd party driver available online called SpaceNav and it’s the best thing that’s ever happened.

    Installation is quick and easy. Just download the zipped file with the extension of your choice, extract it wherever you want, and execute the file named ‘configure’, then run ‘make’, and make ‘make install’, and if you want the changes to be permanent and start the driver everytime you boot, then just run ./setup-init. All these instructions are in a handy file named README! After a reboot, Blender should be up and running with your 3DConnexion Spacemouse.

    Inside Blender

    Once you’re in Blender, you can hit one of the shoulder buttons (the long, skinny buttons on the side) and it will bring up a settings menu for your 3D mouse. From there, you can tweak everything to your liking, including naviation speed, inverting axes, and include some a navigation guide when you fly around.

    That’s it! All done. Enjoy flying around the 3D world with your fancy spacemouse!

    Side Note:

    This is currently not working with the daily build of Blender 2.8 as of March 25, 2019. It works fine on 2.79, though.

    matt

    March 26, 2019
    3D Animation, 3D Modeling, Linux, Ubuntu
    3d animation, 3d modeling, 3dconnexion, b3d, Blender, blender3d, CAD, space mouse
  • Flowblade Review: Most Capable NLE on Linux?

    Flowblade 2.0 Released

    Janne Liljeblad and other contributors released Flowblade 2.0 recently and I thought I’d try it out. I edited a quick 1 minute video from about 10 drone clips shot in 4k. The first impressive feature was how easily I was able to render proxies. It was just as easy to replace them with the original media before the render.

    As both a Premiere user and a Linux user, I’ve been on a quest to find an NLE that is just as capable and intuitive as Premiere, but on Linux. So far, I’ve used only a few and had just ‘okay’ experiences. My first Linux based NLE that I dove headfirst into was Kdenlive. I was cutting some footage for a client and built out the complete project in Kdenlive for a few reasons. First and foremost, at the time, I no longer had access to Adobe CC through a former employer. And finally, even if I had $53/mo, I could think of 1,000 things I’d do before I got an Adobe CC subscription.

    But I digress, this is a post about Flowblade. My experience with Kdenlive was fine, the hotkeys took some getting used to. The alpha channels weren’t automatic either, but it worked. Flowblade, however gave me a much more ‘automatic’ experience. I’m on an older mid-range GTX-970 machine and 4k footage doesn’t playback smoothly. Regardless, it felt like proxies were easier to create in Flowblade than in Premiere. Just a few clicks and it was done. Updated right there in my timeline. And encoding was a breeze. Once I made my edits, which was a pleasure by the way, All I had to do was choose “replace proxies with original media” and I was all set to render.

    Intuitive Experience

    There were several hotkeys that carried over from Premiere and others that just made sense. The i and o keys set in and out points, the HOME and END key pops your playhead to the beginning and end of your timeline, stuff like that. The alpha transparency and title card system took some getting used to, but it wasn’t that bad. I feel like color correction is slightly easier in Flowblade than in Kdenlive. That’s just my experience, and the clips I happen to be working on.

    Overall, I still can’t completely commit to Flowblade, even though it’s a pretty great application for basic edits. If I were a vlogger and just needed something to spit out videos with speed, I’d definitely use Flowblade for everything. And even as a pro editor, I still may use Flowblade for some quick edits here and there, based on the situation. But as long as Resovlve remains an option for Linux users, it no doubt offers the absolute best postproduction experience so far. The grades are otherworldly. I’ve never had so much control over color. Not even in Premiere. Lumetri Color doesn’t even compete with Resolve.

    So far, my only issue with resolve is it can’t take Panasonic .MTS files by default, they have to be transcoded first. And that just may be a “free version” limitation, I’m not sure. Either way, I’m just a few freelance jobs away from picking up a full copy of Resolve for my personal Linux machine, so I’ll keep you posted if my experience changes once I get everything up and running. Until next time.

    matt

    March 19, 2019
    Linux, Ubuntu, Video Editing, Vlogging
    Adobe, creative cloud, kdenlive, linux, nle, postproduction, premiere, ubuntu, video editing
  • How to Use ffmpeg (The Basics)

    The Problem

    It all started when Premiere Pro started glitching out. When I was trying to import a simple image sequence, like I’d done a thousand times before, it only imported the first 25% of the frames. Everything else was missing. There was no inconsistency in the file naming convention. Everything was sequential. There were no missing frames. Premiere is just glitchy.

    The Workaround

    I came up with an idea for a workaround. Instead of importing an image sequence, what if I just concatenated all those image files into a ProRes MOV? That way I can just drop the whole thing into Premiere with no problems. I tried to get Adobe Media Encoder to do that, but it wasn’t the most intuitive experience of my life. Every time I tried to import a sequence, it only gave me the first frame, and ended up rendering frame 1 over the entire length of the sequence. Solution? FFMPEG.

    What is FFMPEG?

    Ffmpeg is a command line application that allows you to manipulate images, video, and audio. It does take some getting used to, but once you get the hang of it, it is WELL worth the time you put in to learn the basics of the application. I do want to emphasize just the basics, as ffmpeg and all of its options are pretty vast.

    As a 3D artist and animator, I deal a lot with image sequences. Unfortunately Premiere and other NLEs can sometimes glitch out and not give you what you want when you import a sequence. FFMPEG allows you to concatenate a series of images and encode those frames into a single video file with a codec and container of your choosing.

    If you have other open source video applications like VLC player or Handbrake, you might already have ffmpeg installed on your system. You can check by running this in the terminal:

    ffmpeg -version

    If you don’t have it, you can get it easily by running:

    sudo apt install ffmpeg

    Now that you’ve got ffmpeg, you can do TONS of stuff with it. There’s a giant list of commands or you can check out the man page:

    man ffmpeg

    You can convert video files as simply as:

    ffmpeg -i input.mp4 output.avi

    The Tricks

    ffmpeg is used to initialize the program, -i is used to set your input file(s), and you can add more options like scale, fps, codecs, bit rates, and more with a long list of options available. For my purposes, I usually want to take a folder full of .png files and convert them into an MOV file for editing. For that, I can just ‘cd’ into the folder containing all my .png frames, and run something like:

    ffmpeg -f image2 -pattern_type glob -framerate 23.976 -i cyclesShotFour_*.png shotFour.mov

    Let’s break that down. The -f tack lets you indicate a format. To see all available formats, just run:

    ffmpeg -formats

    It’s worth noting that formats are different than codecs. To view the massive list of codecs available in ffmpeg, just run:

    ffmpeg -codecs

    Easy, right? Next we told ffmpeg to grab all the .png files in the current working directory matching the pattern we defined. In my example, all my files were named cyclesShotFour_0001.png, cyclesShotFour_0002.png, etc. There’s quite a few ways to define a pattern, and you can learn more here. Once ffmpeg has all your images defined, all you need to set your framerate and other stuff you may want and you’re good to go! Tack -framerate defines your framerate. At the end, just type the name of your output file. That’s it!

    Some of the other options that wasn’t mentioned in the above example, that I use quite frequently is setting the bitrate and the codec. The tacks for those options are -b:v (bitrate for video) -b:a (bitrate for audio) -c:v (codec for video) -c:a (codec for audio). So let’s say I want to encode a bunch of .jpg files into a Apple ProRes MOV file. Clearly, the output won’t have audio, so we don’t have to specify any audio options.

    ffmpeg -f image2 -c:v prores -framerate 23.976 -b:v 6000k -pattern_type glob -i frame*.jpg output.mov

    Anway, there are tons of different things you can do with ffmpeg, and it’s an absolutely amazing tool. It saved my butt just last week! Have fun and keep learning.

    matt

    February 26, 2019
    3D Animation, Linux, Ubuntu, Video Editing
    audio, bitrates, codecs, encoding, ffmpeg, formats, handbrake, linux, media, postproduction, transcoding, video
1 2
Next Page

Prove all things; hold fast that which is good. 1 Thess 5:21