Matt Jones Tech
  • Blog
  • Video Projects
  • Web Projects
  • VFX Workflow: Start to Finish

    Last week I ran into some problems with a project at work that required me to have just basic knowledge of rigging. After burning over an hour watching and rewatching tutorials, and, because I was under a tight deadline, I got frustrated and eventually just edited the mesh directly to get a basic pose.

    Beginnings

    Now that I’ve hit the deadline and delivered the project, I spent the following weekend to fix my problem once and for all.

    I started with a basic mesh comprised of 7 different primitives.

    Which is fine, for arriving at a character shape fairly quickly, but trash when it actually comes time to rig and animate several primitives as if they were one. So once I got my turtle shape, I joined 2 primitives at a time, and joined up the meshes as best I could. Pair by pair, until I had a turtle mesh and a shell mesh. In hindsight, I would have just joined up the shell and the turtle to get one mesh, but that’s what this whole project was for: learning. Once I had my meshes joined, I marked my seams, and UV unwrapped. Then it was time for texture painting!

    Texture Painting

    Not the best UV unwrap, but it works for this project.

    Rigging

    Once my turtle was painted, it was time to rig. Now that the pressure was off, I had an opportunity to actually learn how to properly built a rig, set up IK constraints, and orient joints using pole targets. Woo!

    Motion Tracking

    Now that I had my rig all finished, I was ready to animate. And my IK constraints made it WAY easier to set a few keyframes and get a halfway decent animation. Next, motion tracking.

    This one actually took me a few hours because I was having to relearn how Blender’s requirements for reconstruction. 1) Blender requires 8 continuous tracking points from the first frame to the last to even have enough data to reconstruct the scene. 2) the average solve error needs to be 0.3 pixels to get an accurate track. My first try resulted in a solve error of 35.6 pixels. So eventually, after learning the requirements, trying some addons, and manually helping it along, I eventually whittled the solve error down to 1.4. Close… Technically usable, but still not the best. In the end, I learned a TON from building this little guy from scratch. So without further ado, I present to you, Shelly.

    Hopefully this helped someone. Thanks for reading!

    matt

    May 7, 2019
    3D Animation, 3D Modeling, Blender, Compositing
    3d animation, b3d, Blender, compositing, motion tracking, pipeline, rigging, vfx, workflow
  • How To Build Blender With Mantafow

    UPDATE:

    Mantaflow was pushed to Blender’s master branch on December 16, 2019. Now you don’t have to do all this stuff. It’s already in Blender by default! Hooray!

    Today Mantaflow landed in Blender's master branch! #fluids #b3d #simulation pic.twitter.com/CmVduFgVSN

    — Sebastián Barschkis 🌊 (@sebbas) December 16, 2019

    How To Build Blender With Mantaflow

    Here’s what I know about how to build Blender with Mantaflow. Some software engineers may laugh, but I’ve legit been trying to build Blender with Mantaflow for about a solid month (very off and on mind you, but still). If you don’t know what Mantaflow is or why it’s worth building a new copy of blender for… check out http://mantaflow.com/

    The capabilities of this new (in the Blender world, at least) method of calculating fluid and smoke simulations are insane. Unfortunately, it’s not available as a simple plugin, but you can grab it for FREE, if you’re not afraid of a terminal. (Also, I should note, there’s a new way to get FLIP fluids in blender and it IS a plugin, literally called FLIP Fluids, and it’s currently only stable for Windows and will set you back around $76) Regardless, FLIP fluids are highly efficient, and just all-around better than Blender’s default fluid/smoke simulator.

    So how to I do this? Step one: open a terminal. Don’t worry, it doesn’t bite.

    This is a screenshot of htop running in a linux terminal

    What You’ll Need

    First, you’re gonna need some tools before you can start building Blender with Mantaflow. If you’re on a Mac, there’s quite a bit of installing before you can actually start anything. For more info, check out this build guide for Mac OS Once you have Cmake and XCode development tools installed, you’re good to go. For Linux, you’re basically already good to go. Create a new folder in your home folder called blender-git.

    creating a folder named blender-git in the home directory

    Once you’re inside, clone Blender from the source.

    cloning the blender code from the source repository

    Next is the tricky part. Instead of continuing to follow the directions on wiki.blender.org, you’re gonna want to switch branches by running “git checkout fluid-mantaflow”. You should get a confirmation something like “successfully switched branches, you’re now on the fluid-mantaflow branch”

    NOTE: The Blender source code is always changing, so double check developer.blender.org to keep an eye on the latest branch development.

    checking out the mantaflow branch

    Install Dependencies

    Now you need to install/update dependencies for to build Blender with Mantaflow. You can do so by following the step 2 over on wiki.blender.org . All of the tedious installs that you had to do manually, one by one over on Mac can be done with one simple line in the Linux terminal (I’m not biased).

    updating packages, installing build packages

    Then there’s a special shell script that takes care of all your dependencies just by executing it. Simply run:

    running 'install deps.sh'

    Then you’re nearly ready! One last step! Make sure you can compile the code with Cmake by running:

    installing cmake

    Then you just need to make sure you’re inside the blender folder that was created when you cloned blender, and just run ‘make’.

    building blender with cmake

    if that doesn’t work, or if the build fails… try using the tag that sebbas suggests for compiling on Linux:

    building blender with custom build options

    And that’s it! Once the build succeeds, navigate to your build directory, cd into the bin folder and run ./blender

    Tada! Enjoy the awesome power of FLIP fluids for free!

    matt

    April 9, 2019
    3D Animation, 3D Modeling, Graphic Design, Linux, Motion Graphics
  • Hunted

    This is a VFX shot and edit sequence created for a short video in late March 2019. We couldn’t find the ideal location (an open field surrounding a lone tree) for this shot, and I needed too many specifics to match any stock footage. Short on time, I turned to Blender for the solution. All things considered, I’m pretty pleased with the shot. The entire composite took about 8 hours to design and create, plus and overnight render.

    Timelapse of the compositing process
    Capture 1
    Capture 2

    The project was filmed in less than 4 hours on an overcast morning. I tried to get as little of the sky as I possibly could, as I knew I’d be grading day-for-night. Below is the final result:

    matt

    April 7, 2019
    3D Animation, 3D Modeling, Compositing, Video Editing, Video Portfolio
  • Using 3DConnexion Spacemouse with Linux

    Uh… 3DConnexion Spacemouse Wireless?

    If you’re like me and spend any amount of time in the 3D world, whether it’s for game design, game development, motion graphics, 3D animation, or CAD, you’ve probably felt a bit limited and slow when it comes to navigating the 3D viewport. In some programs, you even have to grab different tools or hold hotkey combos to get the movement you want (zoom, pan, fly, rotate, etc). A company called 3DConnexion has made a fantastic effort to fix all that. For this driver install, I’m using a 3DConnexion Spacemouse Wireless.

    If you’re on a Mac or a Windows machine, it’s as easy as heading over to their site and installing one of their official drivers. It even comes with a little training program to help you get the hang of the basics.

    Unforuntately, 3Dconnextion dropped linux support some time ago. They technically have a Linux driver available on their official site, but it doesn’t work. However, I found the solution:

    Setup

    There is an excellent 3rd party driver available online called SpaceNav and it’s the best thing that’s ever happened.

    Installation is quick and easy. Just download the zipped file with the extension of your choice, extract it wherever you want, and execute the file named ‘configure’, then run ‘make’, and make ‘make install’, and if you want the changes to be permanent and start the driver everytime you boot, then just run ./setup-init. All these instructions are in a handy file named README! After a reboot, Blender should be up and running with your 3DConnexion Spacemouse.

    Inside Blender

    Once you’re in Blender, you can hit one of the shoulder buttons (the long, skinny buttons on the side) and it will bring up a settings menu for your 3D mouse. From there, you can tweak everything to your liking, including naviation speed, inverting axes, and include some a navigation guide when you fly around.

    That’s it! All done. Enjoy flying around the 3D world with your fancy spacemouse!

    Side Note:

    This is currently not working with the daily build of Blender 2.8 as of March 25, 2019. It works fine on 2.79, though.

    matt

    March 26, 2019
    3D Animation, 3D Modeling, Linux, Ubuntu
    3d animation, 3d modeling, 3dconnexion, b3d, Blender, blender3d, CAD, space mouse
  • How to Make Realistic Trees in Blender

    This Christmas….

    This Christmas, I got a 3D graphics assignment. Sorry, I can’t say ‘This Christmas’ without singing it.

    Assignment received

    For this assignment, I was asked to create a look-and-feel animation that conveyed the spirit of Christmas in a general sense. The ending needed to focus on gift giving. First, I developed a concept that involved a gift box opening on it’s own with shafts of light bursting through it. Upon opening, the bow would untie itself and explode into a shower of fabric. The fabric would be so abundant we’d lose sight of everything else for a moment. Finally, the box would fall open to reveal the title inside.

    Obviously, this is a wildly ambitious sequence to create. It would require a ton of time to develop just the cloth sequence, let alone the rest of the animation. To date this project a little, this came at a time when Eevee was still in alpha. Cycles was my only realistic option coming from Blender. However, I ended up running a few test renders before moving in a different direction.

    https://twitter.com/actualmattjones/status/1052989719901028352

    Running out of time

    By the time I landed on the final Christmas tree concept, the deadline for this project was fast approaching. I needed a way to create a realistic Christmas tree and quick. Enter The Grove. This plugin fit a perfect gap in my production pipeline. The controls were very intuitive. After a few minutes of learning the basics of the parameters, I was able to generate branches, attach leaves, and animate a gentle breeze that rendered fast, even in Cycles.

    Here’s the final shot created specifically to be seamless 10 second loop:

    Of course, you can custom model a tree based on tons of references, but the ROI on the time and energy investment didn’t make sense in this instance. Plus, The Grove’s controls make it easy to create virtually any design for a tree that you like! The plugin The Grove version 6, and was purchased for Blender 2.79. Just a few days after the project was completed, Blender 2.80 went into beta and I was automatically upgraded to The Grove version 7. Naturally, the plugin is thoroughly worth it, and if that doesn’t convince you, The Grove was used to create trees in Next Gen.

    So not only did The Grove save the day and help me create a great final product, it also gave me the speed and flexibility that this particular project required. The beauty of this plugin is that it’s not something I feel like I’ll use just once and never touch again. Trees and nature are so commonly needed in production I’m sure I’ll need them again. And what’s more, The Grove creates branches using a particle system. That means you can create one custom branch (e.g. one with a Christmas ornament hanging from it) and populate an entire tree instantly.

    matt

    December 24, 2018
    3D Animation, 3D Modeling
    3d, 3d animation, 3d modeling, Blender, christmas, christmas tree, graphics, The Grove 3D
  • The Gift (3D Animation)

    Flatlay photo to 3D animation

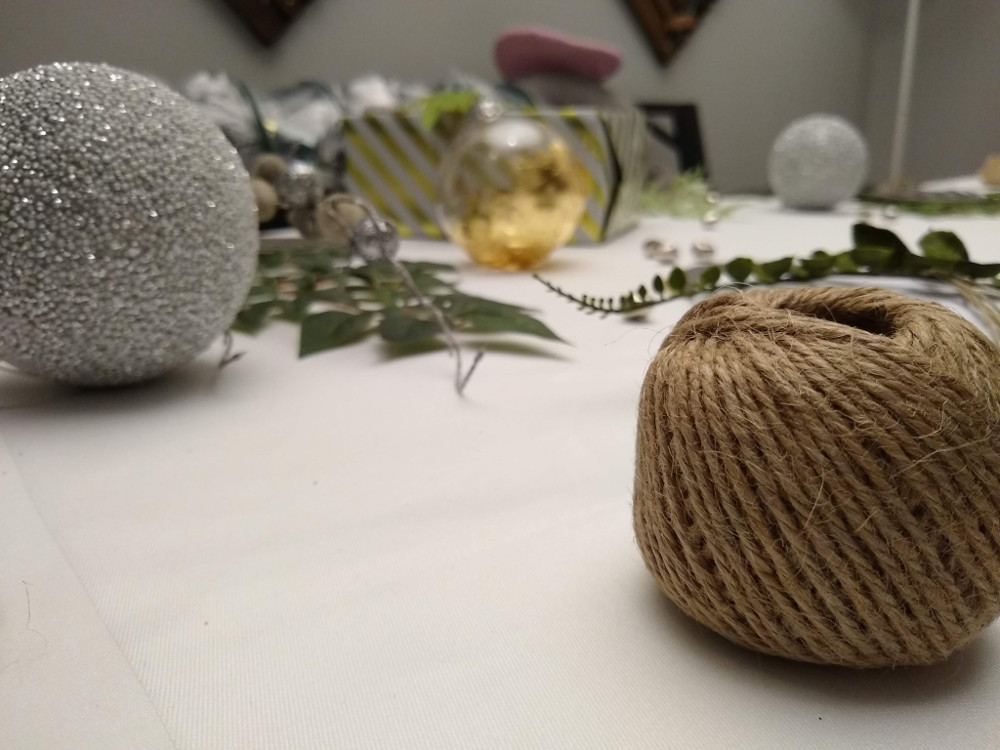
    This year’s Christmas graphic package was a collaboration between photography, arts-and-crafts, and 3D modeling and animation.

    Some of the items in preperation for the flatlay

    From Christmas Graphic to Christmas Animation

    Once we had a flatlay that was acceptable for print, we needed to use the same objects or similar objects that reflected the same style to bring an animation to life. So the next step was taking some of the real-life assets and modeling them from scratch.

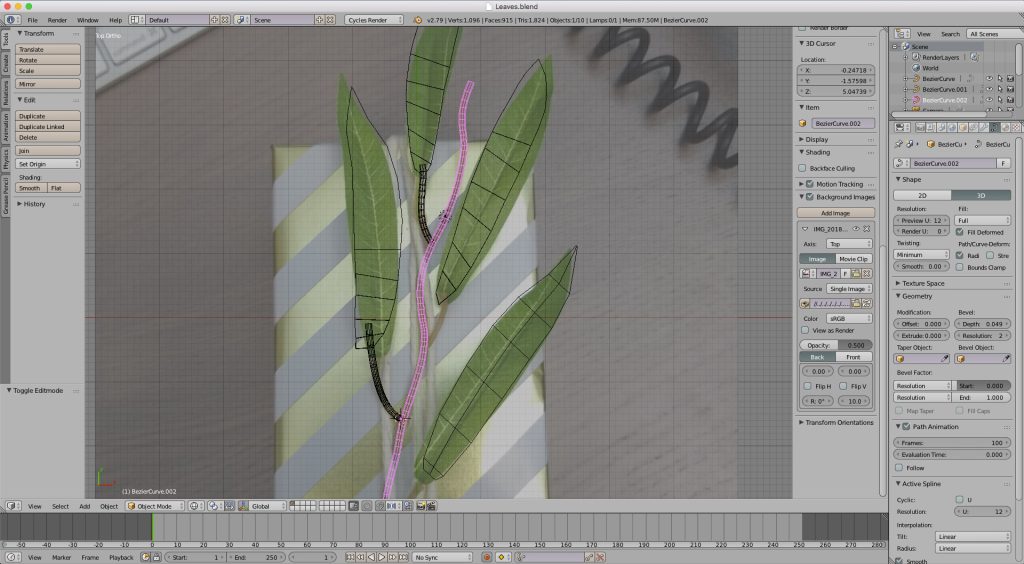
    Modeling leaves based on a real-life plastic plant

    Once the basic model for the plant was created, it was time to model and texture the gift box, as well as the ribbon. In fact, one of the ribbons in this project is available for download over on Sketchfab.

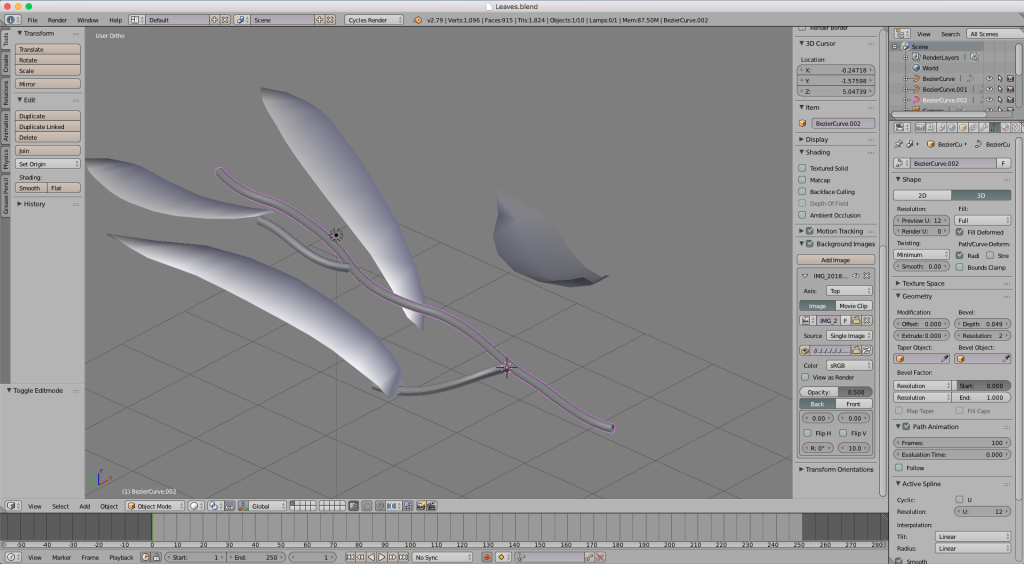
    Unshaded view of the plant decoration, mid-model

    Once all the assets were created, the only thing left to do was add a little animation to help bring everything else to life. I ended up adding a subtle ‘breathing’ animation to the Christmas tree, as well as some camera moves pushing through the scene.

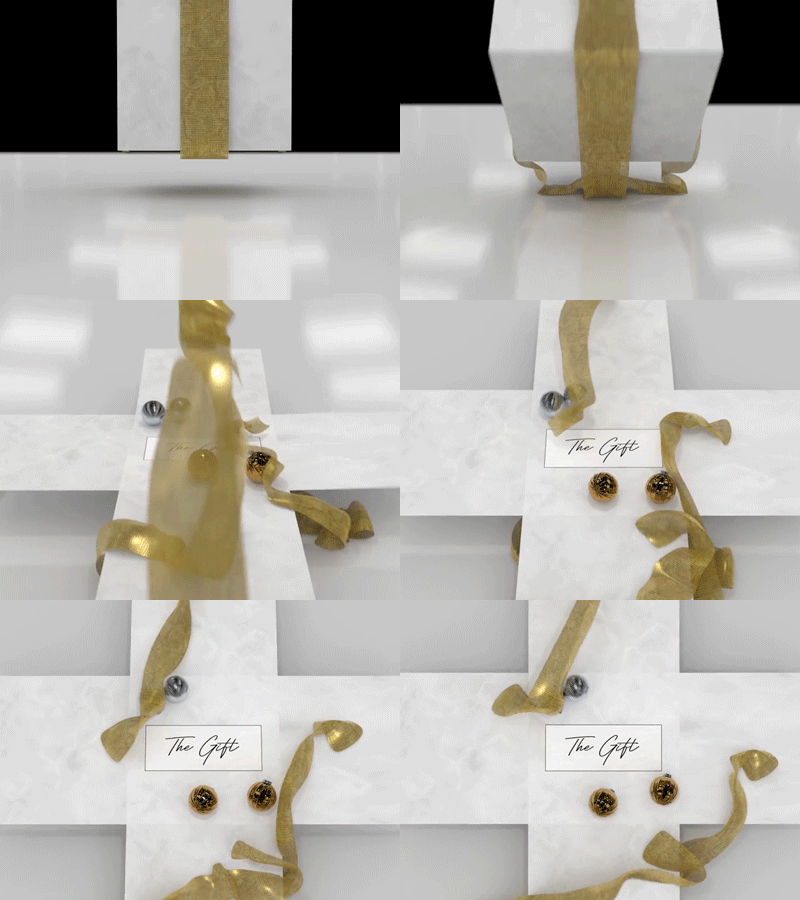
    Render Test that was trashed.

    Originally, I had envisioned a present box that sort of ‘exploded’ with ribbon flying everywhere. The ribbons covered the camera lens for just long enough to enter a small ribbon sequence. Finally, they will fall to reveal the logo inside the box with ribbon lying everywhere on the floor. Time constrains ended up preventing this original vision from ever seeing the light of day. Maybe next year!

    matt

    December 18, 2018
    3D Animation, 3D Modeling, Blender, Video Portfolio
  • A Brand New Add-on Ecosystem for Blender 2.8?

    With the highly anticipated release of Blender 2.8, there is one big question hanging in the air. What’s going to happen to the years and years worth of add-on development work put into versions 2.79 and earlier? The introduction of 2.8 is already groundbreaking in terms of shattering render times and giving artists the option of Cycles and Eevee to render their work, but 2.8 also shakes up Blender at its very core: the source code.

    The API rewrite for Blender 2.8 will essentially force all of the individual add-on developers to update their add-on to be compatible with version 2.8 and up. What does this mean for the end users? This could mean an open door for new developers to enter the world of add-on development for Blender, and potentially put pressure on the existing add-on developers who have contributed to version 2.79 and below.

    As new developers enter the scene, this could put pressure on existing add-ons, as the new tools have potential to be innovative, considering how different Blender 2.8 is from 2.79. This also has the potential to leave some add-ons abandoned, especially if they haven’t been updated in the last year or so. This new development environment also has the potential to push the existing add-ons that have been successful since 2.79 and below to new heights in 2.8.

    At the point of this writing, this is an exciting new world that has tons of potential in either direction it moves forward. Either the existing add-ons upgrade to 2.8 and remain amazing, new add-ons explode onto the scene and take advantage of brand new features unique to 2.8, or some mix of the two. Only time will tell what the future of 2.8 will be, but no matter what happens, the future promises to be a bright one. Rock on, and happy blending!

    matt

    October 24, 2018
    3D Animation, 3D Modeling, Compositing, Motion Graphics
  • Tips for Better Photogrammetry Scans

    With photogrammetry technology being more accessible than ever, I’m sure there are a few beginners out there that are eager to give it a try. If you’re like me, you may have heard some of these tips before, but didn’t give them as much attention as you needed to. Here are some quick tips to help improve your photogrammetry:

    Proper Lighting

    Of all the tips in this list, this one is arguably the most important. When it comes to photography, video, and even photogrammetry, lighting is critical. At the end of the day, you’re just capturing light. So if the quality and/or quantity of light is not great, your results won’t be great either. So your objective for 3D scans is, counter to most photography, flat. Completely flat.

    Try using big light sources like a large softbox or even a window to spread as much soft, diffused light onto your subject as you can. The fewer shadows, the better. If you can manage no shadows, awesome. A good technique for capturing people’s heads or small-to-medium sized objects is to evenly light your subject with two large keys from the left and right, and using a lazy suzan to rotate the object as you take photos. A swiveling chair or stool would work the same when photographing someone’s head.

    Cover your angles

    This one may seem obvious, but it took me a few tries to get it right. During my first few scans, I wanted to get in nice and close, hoping for some ultra high resolution textures as a result. Makes sense, right? If you get in nice and tight, grab all the high-res details, your final textured model will look stellar! Well, not quite… At least with the reconstruction algorithm I was using, photos that are ‘too different’ than the others (aka close-ups) were tossed out from the calculation, so they ended up not even contributing to the final.

    That said, try to keep your entire subject in the frame at all times. This will definitely improve the chances of ALL your images being used to calculate the point cloud. Just a personal technique, I usually start with my low angles first, snap a photo, and move about 10 degrees to the right or left, snap the next and repeat. Once I make my first 360, I move up to the mid (head-on) angle, do a 360, then cover the high angles. It’s always better to have more images than you need, rather than coming up short during the model creation process.

    Shoot Manual

    This helps keep consistency between all your images. Most smartphones come with this feature already, but if not, there are several apps for both Android and iOS that will unlock your camera’s full potential. This prevents your camera from shifting focus, changing exposure, and altering white balance settings in between shots. That way, when you bring in all your photos, they’ll all be the same white balance, the same ISO, shutter speed, and aperture.

    Stay Focused

    This goes hand-in-hand with the ‘shoot manual’ tip, but it’s definitely worth mentioning. If you happen to be shooting in low light, and you’re on a DSLR shooting prime or something like that, if you’re shooting wide open, you’re going to get a very shallow depth of field. It looks lovely, and I love the images from wide-open prime lenses, but this isn’t the application for it. When taking photos to use in photogrammetry, you need to keep your entire subject in focused. This is 2nd most important, right after light. This makes it easier for the computer to see exactly which angle you’re viewing the object from, and will likely result in fewer images being tossed out of the application. If you’re shy on light, don’t open the lens. Get more light in there to allow yourself to shoot f/10 or so, whatever it takes to get your entire subject in focus. Definitely helps you in the long run.

    That’s all for now! If you have any tips of your own, feel free to share them in the comments!

    matt

    October 19, 2018
    3D Modeling, Photogrammetry
    3d, 3d modeling, 3d scanning, photogrammetry, point cloud
  • What is Photogrammetry?

    I’m glad you asked! If you spend much time in the world of 3D modeling and animation, it won’t take you long before you come across this term. Photogrammetry is essentially the process of taking a bunch of photos of an object, and generating a 3D model of the object in the photos. Seems crazy, right?

    Of course like anything, you can spend as little or as much as you want doing this kind of thing, but some may be surprised that you can create your very first 3D photoscan using tools that you probably already have lying around. If you have a computer and a cell phone, you can get started right away!

    Get Started

    First, find the right subject. Bad subjects are hyper-intricate like fine brushes or translucent things like certain types of leaves or glass. Also, your subject has to remain perfectly still while you’re taking pictures. Your two year old nephew and your cat are also bad choices for scanning.

    Good choices for scanning are things that are still, opaque, and don’t have  much reflectivity or transparency. Things like rocks, tree trunks, seashells, or backpacks make great subjects.

    Once you’ve got your subject, you’re ready to rock! Snap a ton of pictures from every angle you can get. And even when you think you’ve got enough, take a few more because when you’re turning these photos into a 3D object later, you’re always better off waiting a few minutes longer because you took too many photos rather than getting a jumbled up mess of geometry because you didn’t take enough photos.

    I didn’t have enough good photos of this object, so the point cloud is sparse.

    You can find good many options for software with a Google search for “photogrammetry software”. Once you’ve got your software, just drop in all your photos, and hit go!

    Wrap it up

    Your photogrammetry software will analyze all of your photos and use the metadata to triangulate the position of various features in each image. A point cloud will result after the first few processes are complete. Point clouds are essentially just points on a three dimensional graph. The information contained in the point cloud can be used to construct a mesh and an image texture resulting in a 3D model you can use anywhere!

    If you want to learn more, just stay tuned because I’ve got a few tutorials planned to hit the learn library later this year! Hope you guys learned something new and I’m pumped to keep sharing. In the meantime, if you’re new to 3D, check out my Blender 2.8 Overview course over in the learn library!

    matt

    October 10, 2018
    3D Modeling, Compositing, Photo Editing, Photogrammetry
  • Free Software That Could Replace Your Adobe Subscription

    If you’re like me, you’ve probably second-guessed how much you’ve shelled out to companies like Microsoft, Apple, Adobe, and others. It costs a great deal to be on the cutting edge of technology, and some software can set you back literally thousands of dollars. Seriously. Have you tried licensing a copy of Maya lately? Let’s check out some free software that could make you money.

    It took me a bit of testing out different software, but I think I’ve compiled a pretty decent list that, I’m personally convinced, with enough skill and creativity could completely replace Adobe Creative Cloud.

    Operating System

    First up, I’m going to start with the most basic. The operating system. Most people think computers fall into 2 categories: Mac vs PC. Well, PC just means ‘personal computer’ so… every consumer computer falls into this category, but- I digress. A great open source alternative to Mac and/or Windows is Ubuntu Linux. There’s TONs of documentation out there and a mega community who supports it.

    Update January 2020: I’ve been using Manjaro on both my work and home machines, and I find it much easier to set up out-of-the-box, and there’s much more support for my video editing applications. I write more about that here.

    Photoshop

    Photoshop is no doubt the industry standard when it comes to image retouching and manipulation. But few people know of a great open source alternative to Photoshop called GIMP. GIMP is an acronym that stands for GNU Image Manipulation Program. Kind of an unusual name, but a stellar piece of software available for free. An excellent choice for users who only need to do minor editing and retouching every now and again.

    Premiere Pro

    This one is a tough one, I’m not going to lie. Depending on how much video you need to edit, how big the project is, and how often you need reliable editing tools, there may not be much of a choice here. Just to be fair, this comment is coming from someone who makes his living and supports his family editing video. If that’s not you, Kdenlive is an excellent choice to edit just about any video you might need.

    Another piece of software on this list is Shotcut. It’s a little more scaled back as far as the technical capabilities, but it’s still able to do some basic edits. I haven’t logged more than a few hours in Shotcut, but it can handle basic edits for small applications like vlogs and home movies. If you need more technical control, I’d check out Davinci Resolve, or Kdenlive.

    Also, this one’s kind of an honorable mention, but just to be clear, this is NOT open source software, but it is excellent (the Hollywood gold standard) software in color correction, and more recently, video editing. It’s now available as free software that can be used with Mac, Windows, and Linux. That of course, is DaVinci Resovle. Definitely worth checking out.

    After Effects

    Again, another toughie, because of the way that this program operates. After Effects is a layer-based compositor, which is the only compositor that I am aware of that operates in this fashion. It makes sense when you view it as a part of Adobe CC as a whole, because Illustrator, Photoshop, Premiere Pro, Lightroom, and others are all layer-based. However, there are a few node-based compositors that are open source that I can suggest. The first, and definitely the most battle-tested is Blender. Easily the most powerful software I’ve ever come across. Another option would be Natron. Natron is more up-and-coming than Blender, but still something to keep an eye on.

    If you’re already checking out Davinci Resolve, then you’ll already have Blackmagic Fusion which comes bundled with Resolve. Admittedly, I have limited experience in Fusion, but from what I gather from coworkers and others who have used it, it’s more than capable for graphics and VFX. It’s a node-based platform much like Blender, Natron, and Nuke, so if you’re coming from a node-based platform, you should feel comfortable pretty quickly!

    Illustrator

    Illustrator is a great platform for creating vector art for use in large-format work like billboard design or design works that require your images to be flexible, such as a web environment. It’s is included in Adobe CC, but there’s also a great open source alternative called Inkscape. An amazing tool for creating vector art and logos, and available for Mac, Windows, and Linux.

    Audition

    Again, if you’re checking out Davinci Resolve, you’ll get another built-in program called Fairlight. My experience at the time of this writing is zero with Fairlight, but from my brief glances at the interface, it looks absolutely capable.

    Another powerful option is Ardour. Conveniently enough, Ardour is available to download and install via the Ubuntu Software Center.

    Missed Something?

    Drop a comment below, or shoot me a message, and I’ll add to this list!

    matt

    October 7, 2018
    3D Animation, 3D Modeling, Compositing, General Computing, Motion Graphics, Photo Editing, Video Editing
    3d animation, 3d modeling, compositing, computing, motion graphics, photo editing, video editing
Previous Page
1 2 3

Prove all things; hold fast that which is good. 1 Thess 5:21