Yes, technically it’s possible to just drop scripts into template files, but it’s not the correct method to use on WordPress sites. WordPress is pretty particular on how it handles JS.
Register Scripts via functions.php
Just a heads up, the functions.php file is pretty sensitive. WordPress requires everything in functions.php to have absolutely perfect syntax, otherwise it will break your entire site. Please don’t mess with it if you’re on live install or don’t have a way to access this file should you get the dreaded white screen of death.
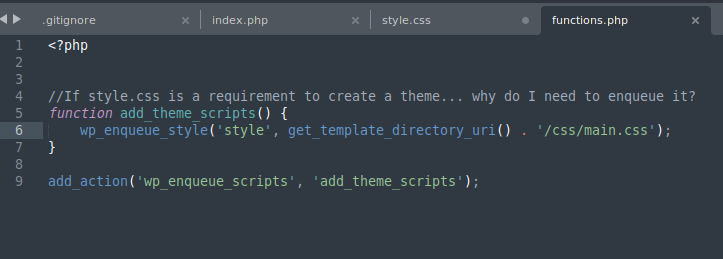
Once you agree to the above mentioned terms and conditions, you’ll want to register your new Javascript file with the wp_enqueue_scripts function, which is most commonly used with a hook like so:
There’s definitely a lot going on here, but basically wp_enqueue_script is expecting a lot of arguments, some required, some optional. The first argument is the name of the script, and that’s required. Next is the filepath of the named script, which funny enough, is actually optional. The default filepath is just an empty string, which refers to the root of the WordPress installation.
In the above example, I actually used another WordPress function get_stylesheet_directory_uri(); which just returns the directory of the currently activated child theme, then you can just concatenate the rest of the filepath with a period in PHP.
Next is an array of dependencies, so if your script depends on other scripts, you can pass those into this array. Mine didn’t have any dependencies, so I just left it as an empty array.
Next is the version number, which is given as a string in single quotes. And finally, the last argument is a boolean which is $in_footer. This is set to false by default. WordPress loads all scripts at the very top of the page, up in the <header>. If your Javascript is manipulating or selecting an element later on down the page, there’s a good chance your script won’t work in the <header>.
If that’s the case, and you need to load your JS in the footer in order for it to work, you can set the very last argument to true and that will drop your script all the way down to the bottom, just before the closing </body> tag.
Today we’re going to take a look at how to enqueue stylesheets in a WordPress block theme. My main stylesheet for a newly created custom WordPress block theme wasn’t loading after several tries and I couldn’t figure out what was going on.
Every search result was just saying , “Oh, you gotta enqueue your stylesheet, just paste this code in…” but it never worked, even after replacing the parts where you had to specifiy the filename and filepath specific to the sheet you’re trying to load.
The Root of My Problem
After several tries, I finally figured it out. My problem wasn’t with wp_enqueue_style(), but rather get_template_directory_uri() and get_stylesheet_uri(), both of which are frequently used to enqueue stylesheets in a wordpress block theme.
get_stylesheet_uri() returns the the actual file named style.css (required to have a theme)
get_stylesheet_directory_uri() returns the filepath to the root of your theme directory (without the trailing slash), so example output would be yourdomain.com/wp-content/themes/your-theme-name
And if that wasn’t enough, there’s one more bit of key information about get_stylesheet_directory_uri():
In the event a child theme is being used, this function will return the child’s theme directory URI. Use get_template_directory_uri() to avoid being overridden by a child theme
Anyway, all that said, if your stylesheet isn’t loading right off the bat, be sure to double check which functions you’re calling in addition to wp_enqueue_style() just to make certain you’re actually pointing to the stylesheet or JS file you’re trying to load.
/*
Theme Name: Twenty Twenty
Theme URI: https://wordpress.org/themes/twentytwenty/
Author: the WordPress team
Author URI: https://wordpress.org/
Description: Our default theme for 2020 is designed to take full advantage of the flexibility of the block editor. Organizations and businesses have the ability to create dynamic landing pages with endless layouts using the group and column blocks. The centered content column and fine-tuned typography also makes it perfect for traditional blogs. Complete editor styles give you a good idea of what your content will look like, even before you publish. You can give your site a personal touch by changing the background colors and the accent color in the Customizer. The colors of all elements on your site are automatically calculated based on the colors you pick, ensuring a high, accessible color contrast for your visitors.
Tags: blog, one-column, custom-background, custom-colors, custom-logo, custom-menu, editor-style, featured-images, footer-widgets, full-width-template, rtl-language-support, sticky-post, theme-options, threaded-comments, translation-ready, block-styles, wide-blocks, accessibility-ready
Version: 1.3
Requires at least: 5.0
Tested up to: 5.4
Requires PHP: 7.0
License: GNU General Public License v2 or later
License URI: http://www.gnu.org/licenses/gpl-2.0.html
Text Domain: twentytwenty
This theme, like WordPress, is licensed under the GPL.
Use it to make something cool, have fun, and share what you've learned with others.
*/
Just a side note, apparently style.css that sits in the root of your theme directory exists for the sole purpose of registering the theme name, author, version, and all that. It’s never intended to hold the actual style code for the theme (I think).
It might work for you, but the minute I tried to enqueue the style.css file that contained all the registration info, it immediately broke the entire site. Of course, I could have been enqueuing it incorrectly too. Anyway, just a thought.
Enqueue Stylesheets Update (8/10/22):
I recently discovered that putting all my child theme styles in an external stylesheet and enqueuing it from a subdirectory via functions.php has caused some strange issues for me when I try to use the Divi Builder.
It appears that this method of loading child theme stylesheets prevents the CSS from loading in the visual builder.
This issue has caused me to rethink my strategy when it comes to enqueuing stylesheets. I have since moved all my styling rules to the primary style.css (used to register the theme) and ditched the function call that enqueues the stylesheet from the child theme’s subdirectory. This move solved all the issues I was experiencing with the visual builder, but I’m still not sure what I was breaking and how I was breaking it.
Next, you just set up your MariaDB database and install WordPress.
cd /var/www/html
sudo rm *
sudo wget http://wordpress.org/latest.tar.gz
sudo tar xzf latest.tar.gz
sudo mv wordpress/* .
sudo rm -rf wordpress latest.tar.gz
Give Apache access to the WordPress folders and files:
sudo chown -R www-data: .
Set up MySQL/MariaDB:
sudo mysql_secure_installation
You will be asked to Enter current password for root (enter for none): Since we’re only setting this server up for testing and development purposes on a local network, I’ll go ahead and enter my root password. In a production environment, you’ll definitely want a strong DB password, different than the root password.
Next, you’ll see something like, you've alredy set a root password, so there's no need to update it (but you can still update it here if you like) press enter.
Remove anonymous users : y
Disallow root login remotely : y
Remove test database and access to it : y
Reload privilege tables now : y
You should see: All done! Thanks for using MariaDB!
Create a WordPress Database
sudo mysql -uroot -p then enter your root password (or DB password if you set it up differently in the mysql_secure_installation command.)
Next you’ll see the Maria DB shell. Your prompt will look like MariaDB [(none)]>. Create a new database named wordpress
create database wordpress;
Mind the semicolon- it’s required.
If this was successful, you’ll see Query OK, 1 row affected (0.00 sec)
No you can grant DB privileges to root. Replace PASSWORDGOESHERE with your password.
GRANT ALL PRIVILEGES ON wordpress.* TO 'root'@'localhost' IDENTIFIED BY 'PASSWORDGOESHERE';
FLUSH PRIVILEGES;
Exit with CTRL + D
Come up with a name for your dev server
I’ll be using deadpool3.com as my example.
Note: At the time of this writing, I own deadpool3.com, but you can use literally any URL you want. You don’t have to own it. (I think google.com may be an exception. They’ve got some fancy code going on and I wasn’t able to get my /etc/hosts to cooperate in my testing.) More on that in a sec.
Configure static IP address
Next, set your static IP address. You can do this by editing one file. Open it by typing sudo nano /etc/dhcpcd.conf
Inside the file (I made a comment above these lines, so I know what I typed if I open this file again later) add the following lines:
So in my case, I made my static IP address 192.168.1.111. Double check your router and network settings for an acceptable range of IP addresses to choose from.
Configure /etc/hosts file on your laptop
Note: You’ll have to edit the /etc/hosts file for every computer on your local network that you’ll be accessing your dev server from. In most home network dev server setups, this will just be a single computer.
Drop the following line at the very bottom of the file ON YOUR LAPTOP or DESKTOP and be sure to replace the IP address with the static IP you just configured in the previous step:
sudo nano /etc/hosts
## Raspberry Pi Server Address ##
192.168.1.111 deadpool3.com
WordPress Configuration
You can either leave your keyboard/mouse/monitor plugged into your pi, and go to localhost in a browser, or grab a different computer on your local network and go to the domain name you set up in /etc/hosts. In my case, it’s deadpool3.com. You should see the WordPress setup screen like this:
Once you’re finished, drop into Settings > Permalinks. Select ‘Post name’ and hit ‘Save Changes’
Configure SSL Encryption
sudo apt install openssl
Create a root key that will be able to generate ssl certs. You can do this by running: mkdir ~/SSLcerts && cd SSLcerts and then openssl genrsa -des3 -out rootCA.key 2048
Create a root certificate by running openssl req -x509 -new -nodes -key rootCA.key -sha256 -days 1024 -out rootCA.pem
Now you’ll need to trust your root CA on every machine you’ll be accessing the server with. To do this, you’ll need to copy the rootCA.pem file to your SSL trusted certs directory on every machine on your local network.
Next, create an OpenSSL configuration file for us to use with our server. sudo nano ~/SSLcerts/deadpool3.com.csr.cnf and paste the following into that file, and save.
Next, we’ll use the configuration options we pasted into deadpool3.csr.cnf to create a key file for deadpool3.com. To do this, type: openssl req -new -sha256 -nodes -out deadpool3.com.csr -newkey rsa:2048 -keyout deadpool3.com.key -config <( cat deadpool3.csr.cnf )
That’s all the files we need to make! Lastly, we need to move the .key and .crt files into a directory where apache2 can access them. In that case, I’m just ging to create a new file in my apache2 root directory like so: sudo mkdir /etc/apache2/ssl
Next, just copy them over. sudo cp ~/SSLcerts/{deadpool3.com.key,deadpool3.crt} /etc/apache2/ssl
And that’s SSL certs generated! Done!
Next, you’ll need to tell Apache where those new SSL keys and certs are. To do this, you’ll need to modify the <VirtualHosts> file. By default, you should have one file named /etc/apache2/sites-enabled/000-default.conf. We’ll use this as a template. sudo cp /etc/apache2/sites-enabled/000-default.conf /etc/apache2/sites-enabled/deadpool3.com.conf
We’ll want to change a few things and add some stuff. At the very top, inside the <VirtualHost> tag, you’ll want to change the port number to 443. Next we’ll add the following to line 2 (above the very first commented out line):
No add these lines just below the opening <VirtualHost> tag
#Custom SSL setup
SSLEngine On
SSLCertificateFile /etc/apache2/ssl/deadpool3.crt
SSLCertificateKeyFile /etc/apache2/ssl/deadpool3.com.key
Next, remove the comment (#) in front of ServerName and replace www.example.com with your server name (in my case, www.deadpool3.com). The remaining defaults should do fine for our purposes.
So at the end, your <VirtualHost> file should look something like this:
<VirtualHost *:443>
	#Custom SSL setup
	SSLEngine On
	SSLCertificateFile /etc/apache2/ssl/deadpool3.crt
	SSLCertificateKeyFile /etc/apache2/ssl/deadpool3.com.key


	# The ServerName directive sets the request scheme, hostname, and port that
	# the server uses to identify itself. This is used when creating
	# redirection URLs. In the context of virtual hosts, the ServerName
	# specifies what hostname must appear in the request's Host: header to
	# match this virtual host. For the default virtual host (this file) this
	# value is not decisive as it is used as  last resort to host regardless.
	# However, you must set it for any further virtual host explicitly.
	ServerName www.deadpool3.com

	ServerAdmin webmaster@localhost
	DocumentRoot /var/www/html

	# Available loglevels: trace8, ..., trace1, debug, info, notice, warn,
	# error, crit, alert, emerg.
	# I t is also possible to configure the loglevel for particular
	# modules, e.g.
	#LogLevel info ssl:warn

	ErrorLog ${APACHE_LOG_DIR}/error.log
	CustomLog ${APACHE_LOG_DIR}/access.log combined

	# For most configureation files from conf-available/, which are
	# enabled or disabled at a global level, it is possible to
	# include a line for only one particular virtual host. For example the
	# following line enables the CGI configuration for this only
	# after it has been globally disabled with "a2disconf".
	#Include conf-available/serve-cgi-bin.conf
</VirtualHost>
Next, we’ll need to take a look at the master apache2.conf file. sudo nano /etc/apache2/apache2.conf. This is a super well-commented out file, so it should be largely self-explanatory. We’re going to scroll down until we find the <Directory> tag for /var/www/. Make sure that the AllowOverride parameter is set to All. Your <Directory> tag should look something like this:
<Directory /var/www/>
	Options Indexes FollowSymLinks
	AllowOverride All
	Require all granted
</Directory>
Progress update for my new web developer portfolio. Creating a 3D museum to showcase all my stuff from 10 years of film and video production. Final product will be a static HTML website that features a full screen 3D museum environment that the user can walk through and interact with.
As a new web developer, I’m looking for a unique way to showcase all of my skills that I’ve acquired over my 10 year career in visual media. I hope you guys like it!
What is HTML? Hypertext Markup Language is the standard way to format text for use on web pages. So if you ever find yourself needing to edit a webpage or create one from scratch, this is the most basic way to display anything on a page.
Basic Structure
HTML is broke up into several different elements, noted by tags. You can write anything you want on your web page, but these tags are at the core of HTML and are used to give your text its structure. Tags are noted with angle brackets <> and wrap around the text that it affects. It should be noted that the tags need to go in a specific order, like so:
Let’s break that down. The first tag is <!DOCTYPE html> and that’s just a one-time declaration to help the computer understand that it’s about to read an HTML document. That way, it knows what to expect. You don’t need to close this tag.
Next, it’s the <html> tag. Everything, the whole page, is contained inside this tag.
The <head> tag is where you keep file path references associated files, like CSS files for styling, Javascript files for functions, and other page metadata like titles. The <head> tag closes with a forward slash and closes out all the page metadata before the <body> tag begins.
Finally, the <body> tag surrounds the main content of your page. Inside this tag, you’ll find lots of tags like <p> (paragraph text), <h1> (largest header text) through <h6> (smallest header text), <ul> (unordered list AKA bullet points), <ol> (ordered list AKA numbered), <a> (anchor tag, used for making clickable links) and <form> for forms. There are several more, but those are some of the most common tags you’ll find.
Why Tags?
These tags server two main purposes. The first and primary purpose is to tell your web browser how to interpret all the text coming from a web page. Is it a title? A paragraph? A list? Table? This provides the overall structure of the page. HTML is often referred to as the “skeleton” of the web page. It’s functional, but not necessarily the most beautiful thing out there.
Additionally, tags provide a great element that CSS files can use to apply style. So instead of applying a style to ALL text in an HTML document, CSS can select just the headings (<h1> tags) and apply styles to just the text inside those element tags.
That’s it for the basics! There are tons of free online courses and videos out on the web to help help get to grips with the basics of web design and development. In this day and age with so much of our lives existing on the internet, it definitely doesn’t hurt to know some of the basics of how the web works.